How to Change Album Cover on iPhone?
When you have an extensive collection of photos, it takes a lot of time to search for a particular photo when you have them all in one place. When the photos are sorted in the iPhone album, looking for a specific photo is easier because you have different categories and will only search for it in that album. It will take less time to scroll through images.
To make things more accessible, you can select a particular album cover for a specific album and do it for all of your albums. If you don’t like the existing cover, you can change it to something you want. All that you need to know about changing the album cover of an album is mentioned below.
The Process of Changing the Album Cover Photo on an iPhone
The primary purpose of an album cover photo is like a thumbnail that tells you what the iPhone album has in it. The default setting for iPhone is to choose the first photo of the album on your iPhone and iPad. Sometimes, the first photo does not represent the whole album, so you might need to change it. There are two main processes to change it, and both of them are for different iOS.
- Steps to change Album Cover for iOS 13 or advanced
- Steps to change Album Cover for iOS previous than 13 and older ones.
For iOS 13 or Advanced
Here are also the steps that you need to follow for iOS 13.
- Open the Photos app, then open the Albums.
- Select the album, the one whose cover photo you want to change.
- Select the photo you want to set as your new cover for that specific album.
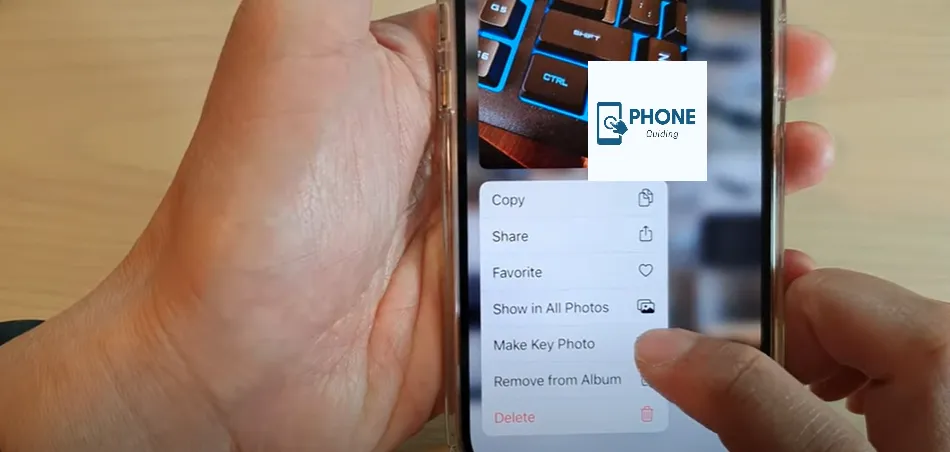
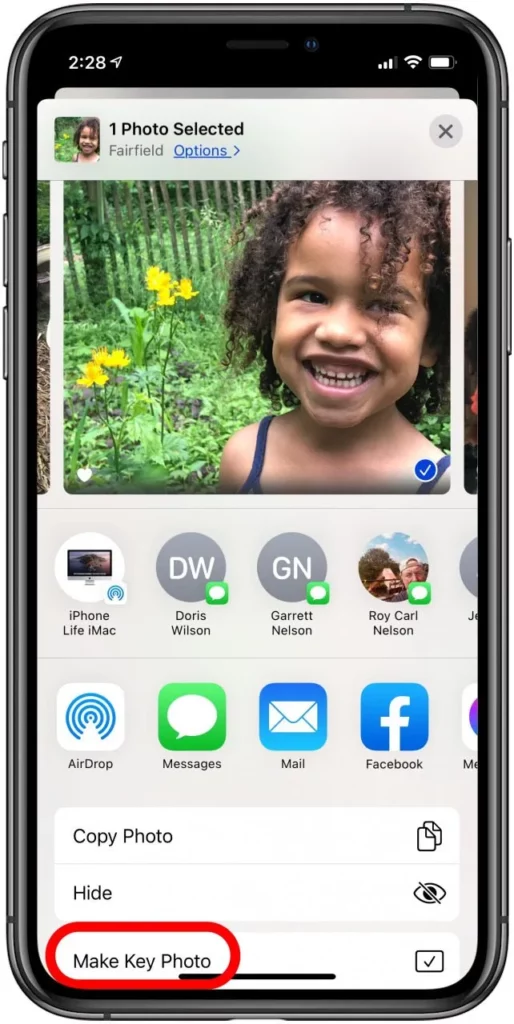
- Now, tap and hold that image until a menu appears, and then “Select Make Key Photo.”
This selected photo will replace the older one.
For Older Versions of iOS
- Open the Photos app, then open the Albums.
- Open the album, the one whose cover photo you want to change.
- Now, select the option in the top right corner, and drag the photo you want to choose as the cover photo into the top-left corner to make it the first photo of the album.
Then, you are all done after saving the changes.
The Process of Creating a New Album
If you are new to using an iPhone, you might wonder about the proper process of creating a new photo album. You need not worry about anything. All you have to do is to follow the steps mentioned above.
- Tap the albums tab, which you can also see at the bottom of the screen.
- The next thing to do is tap the Add button and then choose New Album.
- You will have to select a name for a new album and then name the album.
- Next, you have to click save.
- You can choose any photos and videos to move to your newly created album.
Add New Things to an Album
When you create a new album, you add some stuff to it then and there. But as time passes, you get some stuff destined to be in that album, and you must add it. Here is how you can add new photos and videos to the album.
- Open the app pf photos in full screen.
- Now, choose the More Options button.
- Tap Add to Album.
- Now you have to select one of the following steps.
- To start a new album, Tap New Album, then give the album a name.
- Tap a current album under My Albums to add stuff to an existing album.
Here’s how you add multiple photos and videos to an album.
- When viewing multiple thumbnails, tap Select Present at the top of the screen.
- Now, Tap the Photo and Video thumbnails you want to add and select the More Options button.
- Select “Add to Album” and tap “Add to an existing album” under My Albums.
The Process of Remove Photos and Videos from the Album
You can also delete some of the contents of your albums and for that:
- You have to Open the album.
- Then you must select the photo or video you want to remove to view it in full screen.
- Tap the Trash Can button, then delete it by confirming yes to the confirmation notification.
Reasons to Sort Albums in Photos App
There could be many reasons for someone to create an album. Some people do it because they are obsessed with organizing their stuff and data. Others do it out of convenience because it makes it easy for them to look for a specific photo. Some people want to conserve the time they spend searching for a particular image.
Well! Some people also do it because they think it is cool and because other people are doing it. So, what are you waiting for? Organize your photo app.
How Do I Change Album Covers On Apple Music?
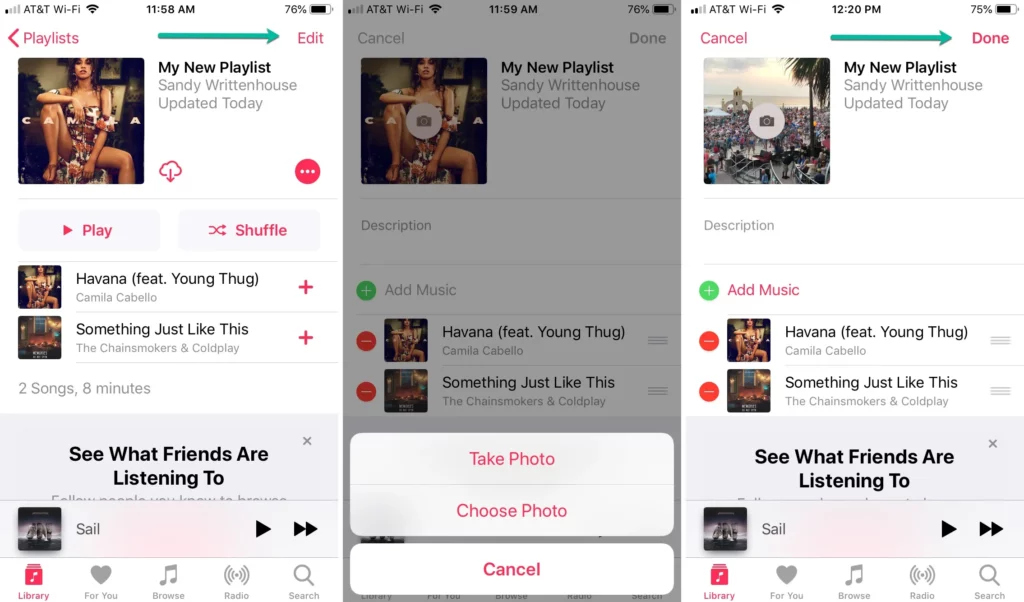
To change the album cover on Apple Music, you can follow these steps:
- Open the Music app on your device and navigate to the album you want to change the cover.
- Tap and hold on to the album cover that is currently displayed.
- A menu will appear with various options. Tap on “Edit.”
- You will now see the album art editing screen. You can select a new image from your device’s photo library or take a new photo as the album cover.
- Once you have chosen a new image, you can adjust its position and size by pinching and dragging it with your fingers.
- When satisfied with the new album cover, tap “Done” to save your changes.
- If the album is already in your iCloud Music Library, your changes will be synced to all devices signed in to Apple Music with the same Apple ID.
Note: If you don’t see the “Edit” option when you tap and hold on to the album cover, it’s possible that it is not editable or you don’t have permission to edit it.
How Do I Change the Album Theme On iPhone?
If you are referring to changing the album theme in the Photos app on your iPhone, you can follow these steps:
- Open the Photos app on your iPhone.
- Tap on the “Albums” tab at the bottom of the screen.
- Tap on the album for which you want to change the theme.
- Tap on the three-dot icon in the top-right corner of the screen.
- Tap on “Edit” from the menu that appears.
- Scroll down to the “Theme” section and tap on it.
- Choose a new theme for the album by selecting one of the options available, such as “Slideshow,” “Mosaic,” “Square,” or “Thumbnails.”
- Once you have chosen a new theme, tap “Done” in the top-right corner of the screen.
The new album theme will now be applied to the album, and you can view the photos in the album with the new theme. The available themes may vary depending on your device’s operating system version.
Wrapping It Up!
iPhone albums are lifesavers for many people. They save you time when looking for a certain photo and keep you from getting a headache or irritation for no reason. Sometimes, people need to add a familiar photo album cover to help them recognize the type of content in the available album. You can easily change the cover of the iPhone album by following the steps mentioned above. You can also add various photos and videos to the albums by editing them. It is easy.
Frequently Asked Questions
Here are also some of the frequently asked questions.
Do old versions of iOS come with the option to create Albums?
Yes, they do. No matter what iOS version you have on your iPhone, you still get the option of editing and creating different types of albums in the photo app of your iPhone.
Is there a limit to creating Albums in iOS?
There is no limit to the number of albums you can create on your iPhone. But you do have to stay considerate about the storage. Creating more albums might be affected if you need more storage.
Do I have to select the Album cover from the photos available in that particular Album?
No, you can select any photo from your photo app, and you don’t have to be particular about the album from which you choose it.
