How to Use the GarageBand App on Your iPhone
In a world where music creation has become more accessible than ever, the GarageBand app on your iPhone is a testament to technology’s power. This innovative app transforms your smartphone into a portable music studio, allowing you to compose, record, and produce music easily. Whether you’re an aspiring musician, a seasoned professional, or simply curious about music production, this comprehensive guide will walk you through the ins and outs of using the GarageBand app on your iPhone.
Introduction: Use the GarageBand App
GarageBand is a versatile digital audio workstation (DAW) developed by Apple for macOS and iOS devices. It’s known for its user-friendly interface, extensive library of virtual instruments, and powerful recording and editing capabilities. The iPhone version of GarageBand brings these features to your fingertips, allowing you to create music wherever inspiration strikes.
Getting Started with GarageBand
Before diving into music creation, you must familiarize yourself with GarageBand’s interface and basic functionalities. Learn how to navigate the app, access the instrument library, and set up your preferences to ensure a smooth workflow.
Creating Your First Project
In this section, we’ll guide you through starting a new project in GarageBand. You’ll explore various project templates tailored for different music genres, ensuring your project’s settings align with your creative vision.
Working with Tracks
Tracks are the building blocks of your music composition. Discover how to add, delete, and organize tracks in GarageBand. We’ll also cover track settings like volume, pan, and automation.
Recording Audio
One of GarageBand’s standout features is its ability to record audio directly on your iPhone. Whether you’re a vocalist, guitarist, or any other instrumentalist, we’ll show you how to capture your performances with professional-quality results.
Using Virtual Instruments
Not a traditional musician? No problem! GarageBand provides an extensive collection of virtual instruments, including pianos, drums, guitars, and synthesizers. Learn how to play, record, and customize these instruments to suit your creative needs.
Editing Your Music
Mistakes happen, but GarageBand gives you the tools to fix them. Explore the editing capabilities of the app, from basic cut and paste to more advanced techniques like quantization and pitch correction.
Adding Effects and Plugins
Enhance your music with various audio effects and plugins available in GarageBand. We’ll guide you through applying reverb, EQ, compression, and more to achieve the perfect sound.
Mixing and Mastering
A great mix can make or break a song. Learn how to balance your tracks, create spatial effects, and master your music to achieve a professional sound ready for sharing.
Sharing Your Music
Once your masterpiece is complete, it’s time to share it with the world. GarageBand offers various options for exporting and distributing your music, from sending it to your friends to uploading it to music streaming platforms.
Tips and Tricks
Unlock the full potential of GarageBand with insider tips and tricks. Discover shortcuts, creative techniques, and best practices to help you become a more proficient music producer.
Troubleshooting Common Issues
Running into technical difficulties? We’ve got you covered. Troubleshoot common GarageBand problems and find solutions to keep your music production journey on track.
starting your musical journey with the GarageBand App
GarageBand is not just an app; it’s a creative playground for musicians and music enthusiasts. Whether you’re an accomplished artist or just starting your musical journey, GarageBand welcomes you with open arms. Let’s begin by exploring the app’s essence and understanding what makes it a go-to tool for music production.
Why GarageBand Matters
Music has a unique ability to connect with our emotions, tell stories, and bring people together. Whether you’re into rock, hip-hop, classical, or any other genre, the desire to create and share music is universal. GarageBand democratizes music production, making it accessible to anyone with an iPhone. Here’s why GarageBand matters:
1. Accessibility
GarageBand puts the power of a recording studio in your pocket. It eliminates the need for expensive equipment and dedicated studio space. All you need is your iPhone, and you’re ready to create music anytime, anywhere.
2. Creative Freedom
You don’t need a band or physical instruments to use GarageBand. You can experiment with various virtual instruments, loops, and effects to craft your unique sound.
3. Learning Platform
For beginners, GarageBand serves as an excellent introduction to music production. Its intuitive interface and guided tutorials help you learn the ropes of recording and composing without a steep learning curve.
4. Professional Results
Despite its accessibility, GarageBand doesn’t compromise on quality. It offers advanced recording and editing tools that can lead to professional-grade music production when used effectively.
5. Sharing and Collaboration
GarageBand isn’t just for solo artists. You can collaborate with other musicians, both locally and remotely, by sharing your projects and working on them together in real time.
Now that you understand why GarageBand is such a valuable tool, let’s dive into the practical aspects of starting the app.
Getting Started with GarageBand
In this section, we’ll walk you through the initial steps of setting up GarageBand on your iPhone, getting acquainted with the interface, and customizing your preferences.
Downloading and Installing GarageBand
If you don’t already have GarageBand installed on your iPhone, you can easily download it from the App Store. Follow these steps to get started:
- Open the App Store on your iPhone.
- Use the search bar to look for “GarageBand.”
- Locate the GarageBand app in the search results and tap “Get” or the download icon to install it.
- Once the installation is complete, tap “Open” to launch GarageBand.
Exploring the GarageBand Interface
A clear and simple interface will greet you when you launch GarageBand, streamlining the music-production process. Let’s take a closer look at the key elements of the GarageBand interface:
1. Main Screen
- This is your workspace, where you’ll create and arrange musical compositions.
- The main screen features a timeline where you can arrange and edit your tracks.
- The top toolbar provides quick access to essential functions such as recording, playback, and settings.
2. Track View
- You’ll find the track view at the bottom of the main screen. This is where you manage your tracks, including audio and MIDI tracks.
- You can add, delete, and organize tracks from this view.
3. Instrument Library
- You’ll see the instrument library to the left of the main screen. This is where you can access virtual instruments and instrument presets.
- You can browse through categories such as keyboards, drums, and guitars and choose the instrument that suits your composition.
4. Smart Controls
- Located to the right of the main screen, smart controls provide quick access to instrument parameters and effects.
- Smart controls can adjust parameters like volume, pitch, and modulation.
5. Editor View
Tapping on a track in the track view opens the editor view. This is where you can fine-tune your recorded or programmed music, including MIDI notes and audio recordings.
6. Settings
You can access the settings menu by tapping the gear icon in the top toolbar. Here, you can configure project settings, metronome settings, and more.
7. Help and Tutorials
If you’re new to GarageBand, tap the question mark icon in the top toolbar to access tutorials and help resources. GarageBand offers guided lessons to help you get started.
Now that you know the GarageBand interface, let’s customize the app to match your preferences.
Customizing GarageBand Preferences
GarageBand offers several customizable preferences to tailor the app to your specific needs. Here’s how you can access and adjust these preferences:
- Tap the gear icon in the top toolbar to open the settings menu.
- In the settings menu, you’ll find various options, including:
- Project Settings: Adjust project-specific settings like tempo, key, and time signature.
- Advanced Settings: Fine-tune audio and MIDI settings such as input and output devices.
- Metronome and Count-In: Configure the metronome settings, including the sound and count-in options.
- Audio Recorder Settings: Adjust the recording format, including sample rate and bit depth.
- File and Sharing Options: Customize file naming conventions and sharing settings.
- iCloud Settings: Manage your GarageBand projects stored in iCloud.
- Help: Access help and tutorials for in-depth guidance on using GarageBand.
Take a moment to explore these preferences and configure GarageBand to match your workflow and creative requirements. Now that you’re comfortable with the app’s interface and settings, it’s time to create your first project.
Creating Your First Project
Creating a project in GarageBand is your first step toward making music on your iPhone. GarageBand offers a variety of project templates to choose from, each tailored to different music genres and styles. Let’s walk through the process of starting a new project:
Launch GarageBand:
- Open the GarageBand app on your iPhone.
Create a new project:
- On the main screen, click the square with a plus sign (+) that says “+ Create Document.”
Choose a Project Type:
- GarageBand offers various project types, including:
- Keyboard Collection: Ideal for creating keyboard-based music.
- Live Loops: This allows you to create music using loops and samples.
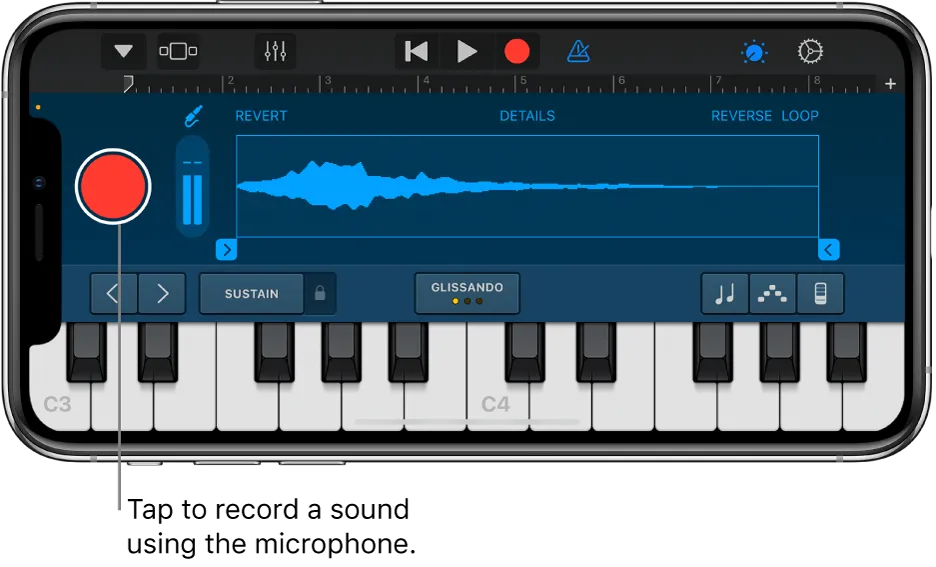
- Audio Recorder: For recording audio tracks with vocals or instruments.
- Drummer: Incorporates virtual drummers for rhythm tracks.
- Select the project type that aligns with your musical vision.
Select a template:
- Multiple templates are designed for different musical styles within each project type. These templates come with preconfigured instrument setups and settings.
- Browse the templates and choose one that suits your project. Don’t worry; you can customize and change instruments later.
Naming Your Project:
- Give your project a name by tapping the field at the top of the screen. This helps you identify your project in your GarageBand library.
Project Settings:
- You can adjust project settings such as tempo, key, and time signature if needed by tapping “Settings” in the top-right corner.
Create:
- Once you’ve selected a template and configured your settings, tap the “Create” button. GarageBand will create your new project and take you to the main screen.
- Congratulations! You’ve just created your first GarageBand project. Now that you have a project to work on let’s explore the essential components of GarageBand, starting with working with tracks.
Working with Tracks
Tracks are the fundamental building blocks of your GarageBand project. They represent individual elements of your composition, whether it’s an instrument, audio recording, or MIDI sequence. Understanding how to manage and organize tracks is crucial to effectively creating music in GarageBand.
Adding Tracks
To add a new track to your project, follow these steps:
Open the Track View:
- In the main screen, tap the “View” button (represented by a grid icon) in the top toolbar. This opens the track view at the bottom of the screen.
Add a Track:
- In the track view, press the “+” button (a plus sign). A menu will appear with options for adding different types of tracks.
- Choose the type of track you want to add:
- Software Instrument: This type of track is used for virtual instruments and MIDI sequences.
- Audio Recorder: Use this for recording audio from your iPhone’s microphone or external audio interfaces.
- Drummer: Access virtual drummers for rhythm tracks.
- Audio Unit Extensions: If you have compatible audio unit plugins installed on your iPhone, you can add tracks for them here.
Customize the Track:
- Depending on the type of track you’ve added, you may have options to select an instrument, adjust settings, or choose a preset. Customize the track to your liking.
Confirm:
- After customizing the track, tap “Create” or “Add.” The new track will appear in the track view.
You can repeat this process to add as many tracks as you need for your composition. Tracks can be rearranged by tapping and dragging, making it easy to organize your project.
Deleting Tracks
To delete a track in GarageBand, follow these steps:
Select the Track:
- In the track view, tap the track you want to delete to select it. The selected track will be highlighted.
Delete the Track:
- With the track selected, tap the trash can icon in the top toolbar. A confirmation message will appear.
Confirm Deletion:
- Tap “Delete” in the confirmation message to remove the selected track from your project.
Renaming Tracks
Renaming tracks can help you keep your project organized. To rename a track, follow these steps:
Select the Track:
- In the track view, tap the track you want to rename to select it.
Access the Track Settings:
- Tap the “Track Settings” button (a wrench icon) in the top toolbar. This will open the track settings for the selected track.
Rename the Track:
- In the track settings, tap the current track name to edit it.
- Type in the new name for the track.
Save the Changes:
- Tap anywhere outside the track settings to save the new track name.
Track Controls
Each track in GarageBand has a set of controls that allow you to adjust various parameters. These controls can vary depending on the track type but often include:
- Volume: Adjust the track’s volume level.
- Pan: Control the track’s stereo pan (left/right balance).
- Mute: silence the track.
- Solo: Isolate the track for playback.
- Record Enable: Enable or disable recording for the track.
- Track Settings: Access additional track-specific settings.
By mastering track management, you’ll have the foundation to start building your musical composition in GarageBand. Next, we’ll explore the different audio recording methods within the app.
Recording Audio
Recording audio is a fundamental aspect of music production, and GarageBand makes it incredibly easy to capture your performances directly on your iPhone. GarageBand offers versatile recording capabilities, whether you’re a vocalist, instrumentalist, or sound designer. Let’s explore how to record audio in GarageBand:
Recording with a Microphone
If you want to record your voice or an acoustic instrument, use your iPhone’s built-in microphone or an external microphone connected to your device. Follow these steps to record audio:
Select an Audio Recorder Track:
- Add a new audio recorder track to your project by following the steps outlined in the previous section.
Prepare for Recording:
- Connect your headphones to your iPhone for monitoring (optional but recommended).
- Position your iPhone’s or external microphone appropriately for the best sound capture.
- Ensure the track is record-enabled by tapping the record-enable button on the track controls.
Set Your Levels:
- Before recording, adjust the track’s volume and gain controls to achieve the desired recording level. Avoid recording too loudly to prevent distortion.
Count-In (Optional):
- If you want a count-in before recording starts, enable the metronome and count-in feature in the settings menu.
Start Recording:
- Tap the red circle-depicted record button in the top toolbar to start recording.
- Perform your audio recording while monitoring through your headphones.
- You can stop and resume recording as needed by tapping the pause button, which looks like two vertical lines.
Stop Recording:
- When you’re finished recording, tap the stop button (represented by a square) in the top toolbar.
- Your recorded audio will appear in the track view on the audio recorder track.
Recording with a MIDI Controller
If you’re using a MIDI controller or a virtual instrument, GarageBand makes it easy to record MIDI data for your compositions. Follow these steps to record MIDI:
Select a software instrument track:
- Add a new software instrument track to your project by following the earlier steps.
Choose an Instrument:
- Select the virtual instrument you want to play. GarageBand offers many options, including keyboards, synthesizers, and drums.
Enable Record:
- Ensure the software instrument track is record-enabled by tapping the record-enable button on the track controls.
Record MIDI:
- Tap the red circle-depicted record button in the top toolbar to start recording.
- Play your MIDI controller or use the on-screen keyboard to record MIDI notes and performance data.
- Like audio recording, you can pause and resume recording as needed.
Stop Recording:
- When you’re finished recording MIDI, tap the stop button (represented by a square) in the top toolbar.
- Your recorded MIDI data will appear on the software instrument track.
Recording with a Virtual Drummer
- GarageBand’s virtual drummers provide dynamic rhythm tracks for your compositions. You can customize their performances and record them for your project.
Select a Drummer Track:
- Add a new drummer track to your project by following the earlier steps.
Choose a Drummer:
- GarageBand offers a selection of virtual drummers, each with unique styles and characteristics. Choose the one that best fits your composition.
Customize Drummer Settings:
- Tap the settings button (represented by a gear icon) on the drummer’s track controls to customize the drummer’s performance.
- Adjust complexity, fills, and swing parameters to match your creative vision.
Record Drummer Track:
- Tap the record button (represented by a red circle) in the top toolbar to begin recording the drummer’s track.
- The virtual drummer will perform based on the settings you’ve chosen.
Stop Recording:
- When satisfied with the drummer’s performance, tap the stop button (represented by a square) in the top toolbar.
- The recorded drummer’s track will appear in the track view.
Recording audio is a dynamic and creative process in GarageBand. Whether you’re capturing vocals, instruments, or virtual performances, the app provides the tools to produce professional-quality recordings. The next section will explore another facet of GarageBand—using virtual instruments.
Using Virtual Instruments
Virtual instruments are the heart and soul of GarageBand, allowing you to create music without the need for physical instruments. Whether you’re a pianist, guitarist, or synth enthusiast, GarageBand’s extensive collection of virtual instruments has something for everyone. Let’s delve into the world of virtual instruments and learn how to use them in your projects.
Accessing Virtual Instruments
To access GarageBand’s virtual instruments, follow these steps:
Open the Instrument Library:
- In the main GarageBand screen, tap the instrument library icon (represented by a keyboard) on the left side of the screen. This will open the instrument library.
Select an Instrument:
- Browse the instrument categories, including keyboards, guitars, basses, drums, and more.
- Tap on the instrument you want to use. GarageBand will load the instrument and make it available for you to play.
Playing Virtual Instruments
- Playing virtual instruments in GarageBand is akin to playing their real-world counterparts. You can use the on-screen keyboard, fretboard, or drum pads to perform. Here’s how to get started:
Select an Instrument:
- Choose the virtual instrument you want to play by following the earlier steps.
Open the Keyboard or Fretboard:
- Depending on the instrument type, you’ll see an on-screen keyboard or fretboard.
- Tap the keys on the keyboard or frets on the fretboard to trigger sounds. You can slide your fingers for pitch bends and other expressive techniques.
Adjust Octaves (Optional):
- If you need to access higher or lower octaves, use the arrow buttons on the keyboard or fretboard to shift octaves.
Use Drum Pads (For Drum Kits):
- GarageBand provides pads you can tap to trigger drum sounds if you’re playing a drum kit.
- Each pad corresponds to a different drum or percussion instrument.
Customizing Instrument Sounds
GarageBand offers a wealth of options for customizing the sound of virtual instruments. You can adjust tone, sustain, and release parameters to shape your instrument’s character. Here’s how:
Access Smart Controls:
- Tap the smart controls icon (a knob) in the top toolbar while playing a virtual instrument.
- This opens the smart controls panel, where you can adjust instrument parameters.
Adjust Parameters:
- Use the knobs, sliders, and switches in the smart controls panel to modify the instrument’s sound in real time.
- Experiment with different settings to achieve the desired tone and character.
Save and Recall Presets:
- If you create a sound you love, you can save it as a custom preset for later use.
- To save a preset, tap the icon in the smart controls panel and choose “Save User Preset.”
Recording Virtual Instruments
Once you’ve selected and customized a virtual instrument, you can record your performance in your GarageBand project. Follow the steps for recording audio, as outlined in the previous section, to capture your virtual instrument performance.
Recording virtual instruments is not limited to keyboards and guitars. GarageBand also offers a wide range of synth and electronic instruments, allowing you to explore various genres and styles. Whether composing classical piano pieces or crafting electronic dance tracks, GarageBand’s virtual instruments empower you to bring your musical visions to life.
In the next section, we’ll explore the art of music composition and arrangement, including how to edit your music within GarageBand.
Editing Your Music
The ability to edit your music is a crucial aspect of music production, and GarageBand provides powerful editing tools to fine-tune your compositions. Whether you’re correcting mistakes, arranging sections, or adding musical nuances, the app offers many editing capabilities. Let’s dive into the world of music editing in GarageBand.
Navigating the Timeline
The timeline is where you arrange and edit your musical composition in GarageBand. It’s the canvas where you place and manipulate regions, loops, and recorded performances. Here’s how to navigate the timeline effectively:
- Zoom In and Out: Pinch your fingers on the timeline to zoom in and out. This allows you to focus on specific sections or see the entire composition.
- Scroll Left and Right: Swipe left or right on the timeline to navigate through your project. This is especially useful when working on longer compositions.
- Move the Playhead: The playhead is a vertical line that indicates the current playback position. You can tap and drag the play head to any point in your composition to audition or edit specific sections.
Adding Regions and Loops
Regions are individual musical segments in your project, such as recordings, MIDI sequences, or loops. GarageBand provides various ways to add regions to your timeline:
- Recording: To record a performance, tap the record button, play your instrument, or sing into your iPhone’s microphone. The recorded performance will appear as a region in the timeline.
- Virtual Instruments: When you play a virtual instrument in GarageBand, your performance is recorded as a MIDI region. You can edit MIDI regions to modify notes, timing, and dynamics.
- Loops: GarageBand offers a vast library of loops, including drum beats, basslines, and melodies. Tap the loop browser icon (which looks like a loop icon) in the top toolbar to add a loop to your project. Browse and preview loops, then drag and drop them into your timeline.
Editing Regions
Once you’ve added regions to your timeline, you can edit and manipulate them to craft your composition. Here are some common editing tasks:
- Trimming Regions: To shorten or lengthen a region, tap and drag its edges left or right.
- Splitting Regions: If you want to divide a region into two parts, position the playhead where you want to make the split and tap the split button (a scissors icon) in the top toolbar.
- Copying and Pasting: To duplicate a region, select it and tap the copy button (represented by two overlapping squares) in the top toolbar. Move the playhead to the desired position and tap the paste button (represented by a clipboard icon) to paste the copied region.
- Quantization (MIDI Regions): For MIDI regions, GarageBand allows you to quantize notes to the grid, aligning them with the beat. Access the quantization settings in the smart controls panel for the selected MIDI region.
Using the Arrangement Track
- The arrangement track is a powerful tool for structuring your composition. It allows you to define sections such as verses, choruses, and bridges in your music. Here’s how to use the arrangement track:
Open the Arrangement Track:
- Tap the arrangement track button (pencil icon) in the top toolbar. This will reveal the arrangement track above the timeline.
Add Sections:
- Tap the “+” button in the arrangement track to add sections to your composition. You can name these sections to indicate their purpose, such as “Verse,” “Chorus,” or “Bridge.”
Move Sections:
- Tap and drag sections in the arrangement track to reorder them. This allows you to experiment with different song structures.
Copy and Paste Sections:
- To duplicate a section, tap the section label to select it, then tap the copy button. Move the playhead to the desired position and tap the paste button to insert a copy of the section.
- The arrangement track is particularly valuable when working on songs with complex structures or multiple instrument arrangements. It helps you visualize and organize your music effectively.
Undo and Redo
Mistakes happen, and that’s okay. GarageBand provides an undo and redo feature to help you backtrack and correct errors or changes you’ve made. Tap the undo button in the top toolbar (which looks like a curved arrow pointing left) to reverse an action. To redo an action, tap the redo button (represented by a curved arrow pointing right).
Editing is an iterative process, and experimenting with different arrangements and modifications is all part of the creative journey. With GarageBand’s editing tools at your disposal, you have the flexibility to refine your music until it matches your artistic vision.
In the next section, we’ll explore how to enhance your music using a variety of audio effects and plugins within GarageBand.
Adding Effects and Plugins
Audio effects and plugins are essential in music production, allowing you to shape and sculpt your sound perfectly. GarageBand offers various built-in audio effects and supports third-party audio unit plugins. This section will explore how to apply effects and plugins to your tracks in GarageBand.
Using Built-in Audio Effects
GarageBand has diverse built-in audio effects you can apply to your tracks. Here’s how to use them:
Select a Track:
- Choose the track to apply an effect by tapping it in the track view.
Access the Smart Controls:
- Tap the smart controls button (a knob icon) in the top toolbar. This opens the smart controls panel for the selected track.
Apply Effects:
- Scroll down to the “Plug-ins and EQ” section in the smart controls panel.
- Tap the “Edit” button to access the audio unit extensions and built-in effects.
Choose an Effect:
- Scroll through the available effects and tap on the one you want to apply. A settings panel for that effect will appear.
Adjust Effect Parameters:
- Adjust the parameters of the knobs, sliders, and switches in the effect’s settings panel.
- Experiment with different settings to achieve the desired sound.
Enable/Disable Effects:
- Tap the power button next to its name in the settings panel to enable or disable an effect.
Using Audio Unit Extensions (Third-Party Plugins)
GarageBand supports audio unit extensions and third-party plugins that expand your audio processing capabilities. Here’s how to use audio unit extensions in GarageBand:
Install Audio Unit Extensions:
- Visit the App Store and download audio unit extension plugins that suit your needs. These can include EQs, compressors, reverbs, and more.
Open GarageBand:
After installing audio unit extensions, open GarageBand on your iPhone.
Select a Track:
- Choose the track you want to apply a third-party plugin to by tapping it in the track view.
Access the Smart Controls:
- Tap the smart controls button (a knob icon) in the top toolbar. This opens the smart controls panel for the selected track.
Apply an Audio Unit Extension:
- Scroll down to the “Plug-ins and EQ” section in the smart controls panel.
- Tap the “Edit” button to access the audio unit extensions.
Choose a Plugin:
- In the audio unit extensions panel, tap the name of the third-party plugin you want to use. A settings panel for the plugin will appear.
Adjust Plugin Parameters:
- Adjust the parameters of the knobs, sliders, and switches in the plugin’s settings panel.
- Explore different settings to shape your sound to your liking.
Enable/Disable Plugins:
To enable or disable a third-party plugin, tap the power button next to its name in the settings panel.
Adding Effects to Specific Sections
You can apply effects and plugins to specific sections of your composition rather than the entire track. This allows you to create dynamic changes in your music. Here’s how to apply effects to specific sections:
Select a Section:
- Select the section you want to apply effects to in the timeline by tapping it.
Access the Effects:
- Tap the section settings button (a gear icon) in the top toolbar.
Apply Effects:
- Scroll down to the “Plug-ins and EQ” section in the section settings.
- Tap the “Edit” button to access the audio unit extensions and built-in effects.
Choose and Adjust Effects:
Follow the steps mentioned earlier to choose and adjust the effects for the selected section.
- Applying effects and plugins strategically can transform your music and bring out its full potential. Whether aiming for a clean and polished sound or experimenting with experimental effects, GarageBand provides the tools to achieve your sonic vision.
- The next section will explore the art of mixing and mastering your music within GarageBand.
Mixing and Mastering
Mixing and mastering are the final stages in music production, where you shape and polish your tracks to achieve a professional and cohesive sound. GarageBand offers powerful tools for mixing and mastering, allowing you to refine your music and prepare it for sharing with the world.
The Art of Mixing
Mixing involves balancing and enhancing the individual elements of your composition to create a cohesive and pleasing sonic experience. Here’s how to approach mixing in GarageBand:
Adjusting Volume Levels
Balance the volume levels of your tracks to ensure that no instrument or element dominates the mix.
- Use the volume sliders in the smart controls panel for each track to make level adjustments.
- Listen critically and make subtle changes to achieve a well-balanced sound.
Panning
- Panning determines the position of each track in the stereo field. For example, you can place a guitar track on the left and a keyboard track on the right for a wider sound.
- Use the pan knobs in the smart controls panel to adjust the panning of each track.
- Experiment with panning to create spatial depth and separation in your mix.
EQ (Equalization)
- EQ allows you to shape the tonal characteristics of each track. For example, you can boost the bass frequencies of a bass guitar or add brightness to a vocal track.
- Access the EQ settings in the smart controls panel for each track and use the frequency sliders to make adjustments.
- Use EQ to carve out space for each instrument in the frequency spectrum.
Effects and Plugins
- Continue to use audio effects and plugins as needed during mixing to enhance specific tracks or create unique sonic textures.
- Experiment with reverb, delay, compression, and other effects to add depth and dimension to your mix.
Automation
- Automation lets you control parameters like volume, pan, and effects settings over time. This is useful for creating dynamic changes in your mix.
- To add automation, tap the automation button in the smart controls panel for a track and select the parameter you want to automate.
- Draw automation curves in the track editor to control the parameter’s values throughout the song.
The Art of Mastering
Mastering is the final step in music production, where you prepare your mix for distribution and ensure it sounds its best across different playback systems. Here’s how to approach mastering in GarageBand:
1. EQ and Compression
- Apply a mastering EQ to the entire mix to make subtle tonal adjustments.
- Use a mastering compressor to control the dynamic range and make the mix sound more cohesive.
2. Limiting
- Use a limiter to prevent the mix from clipping and to increase overall loudness.
- Set the limiter’s threshold and ceiling to achieve the desired loudness level without distortion.
3. Exporting
- When exporting your mastered mix, choose a high-quality audio format such as WAV or AIFF for the best sound quality.
- Adjust the export settings to match the requirements of your intended distribution platform (e.g., streaming, CD, or digital download).
4. Reference Tracks
- Compare your mastered mix to commercial tracks in a similar genre to ensure it stands up in tonal balance and loudness.
- A/B referencing can help you make final adjustments to your master.
Exporting Your Masterpiece
Once you’ve mixed and mastered your music to perfection, it’s time to share it with the world. GarageBand offers straightforward export options for your final composition:
Save Your Project:
Before exporting, make sure to save your GarageBand project. This preserves all your work in a format that allows future editing.
Export the Song:
- In the top toolbar, click the share button (a square with an upward-pointing arrow).
- Choose “Song” to export the entire composition or “Track” to export individual tracks.
Select Format and Settings:
- Configure the export settings, including format (e.g., AAC, WAV, or AIFF), sample rate, and bit depth.
- Adjust the settings to match your distribution platform’s requirements.
Export:
- Tap “Export” to generate the final audio file. You can save it to your device, send it via email, or upload it to cloud storage.
Distribution:
Share your music on streaming platforms, social media, or distribute it digitally or on physical media, depending on your goals.
Congratulations! You’ve now learned how to create, record, edit, mix, master, and export music using the GarageBand app on your iPhone. With dedication, creativity, and practice, you can use GarageBand to craft incredible music and share your artistic expressions with the world.
Conclusion
GarageBand for iPhone is a versatile and powerful music production tool that empowers you to create music anytime and anywhere. Whether a seasoned musician or a beginner, GarageBand provides the tools and features to turn your musical ideas into reality.
In this comprehensive guide, we’ve covered every aspect of using GarageBand on your iPhone, from navigating the interface to recording, editing, mixing, and mastering your music. Armed with this knowledge, you have the foundation to embark on your musical journey, experiment with different genres, and produce high-quality tracks right from your pocket.
Don’t let early difficulties deter you because music production is a skill that gets better with practice. Keep experimenting, learning, and refining your techniques, and you’ll unlock your full creative potential in GarageBand.
Now, it’s time to dive into the world of music creation and unleash your inner artist. Start that new project, record that melody, and let the music flow. Your iPhone is your studio, and the possibilities are endless. Happy music-making!

